theCISO.ca
Bald Range Wildfire · Summerland, British Columbia

From wildfire to recovery

A 75-second narrated story using real Summerland wildfire footage and photographs, followed by a practical demonstration of the free Receipt Capture tool.

Why this film is here: the software was created from the practical experience of managing receipts during a wildfire insurance claim. The opening images show the real Bald Range Wildfire conditions in Summerland; the second half shows exactly how the tool helps organize the paperwork that follows.
Free Project · Receipt Capture V1.03

Make one difficult part of an insurance claim a little easier.

Receipt Capture turns a smart phone into a private wireless receipt camera. Photograph a receipt, review it immediately on your computer, correct the merchant/date/amount, and build organized Excel and ZIP submission packages without accidentally resending the same receipts.

Windows 10 / 11macOSLocal Wi-FiNo cloud requiredXLSX + ZIP exports
Summerland, British Columbia · Bald Range Wildfire

A note from the author

This free project is being shared especially for residents and families affected by the 2026 Bald Range Wildfire in Summerland, BC, and is available to anyone managing an insurance claim.

I truly hope you and your family are safe. I understand that a wildfire evacuation, loss, and the insurance process can be a terrible and stressful time. My hope is that Receipt Capture saves you some administrative time so you can spend more of it with your family.

Please also be patient with your claims adjuster. They are doing the best they can to work through your claim with you, and they understand some of the stress you are going through.

Why this project matters

Wildfire impact in Summerland

These photos and this short video capture the intensity of the 2026 Bald Range Wildfire and the stress local families were facing while trying to protect their homes, evacuate safely, and begin the insurance process.

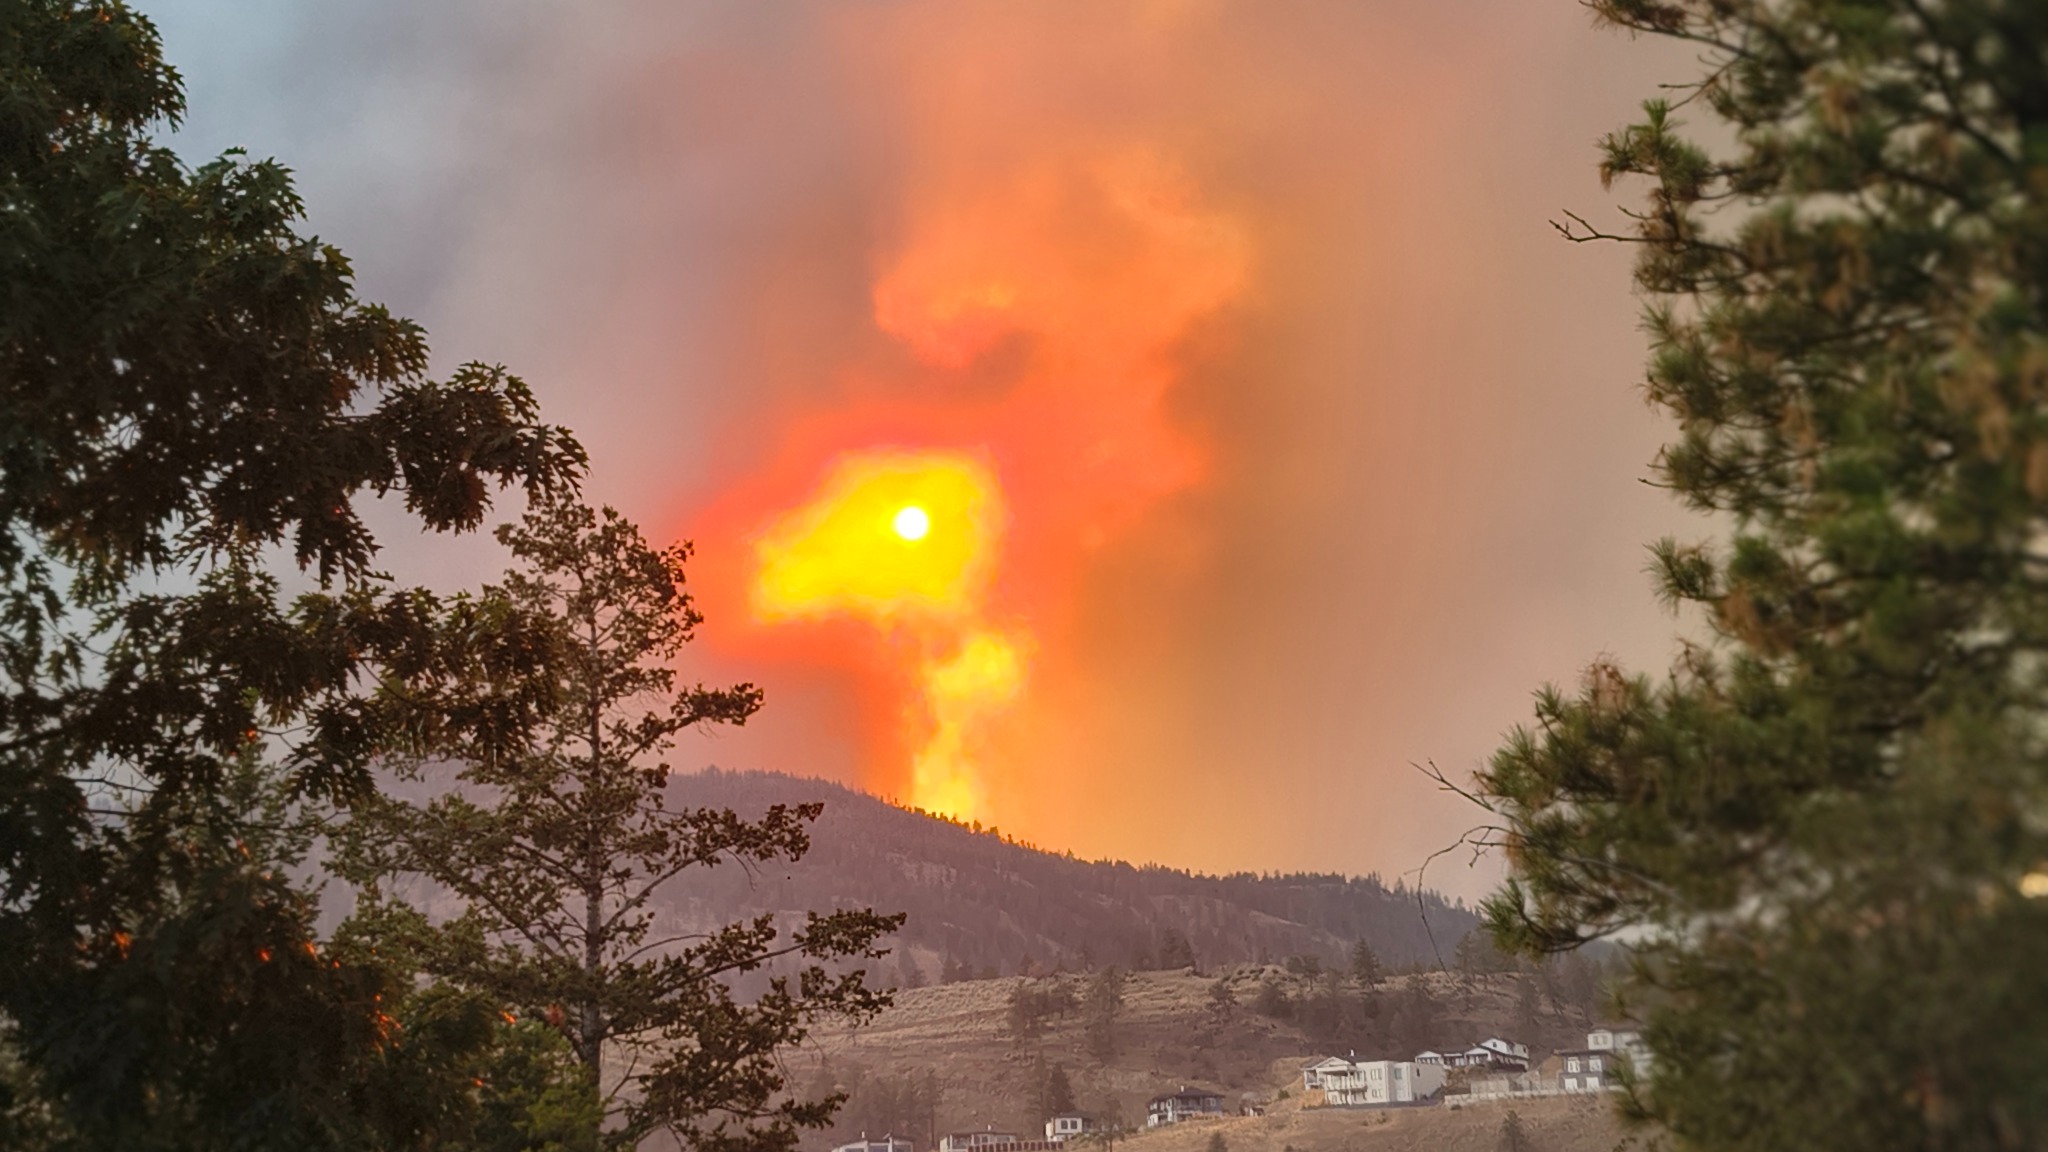
Daytime view of the Bald Range Wildfire with smoke and flame above Summerland

Daytime fire conditions

Smoke columns and visible flame showed how immediate the threat had become for nearby neighbourhoods.

Night view of the wildfire turning the sky red over Summerland

Night sky over Summerland

The red sky and fire glow made the scale of the emergency impossible to ignore.
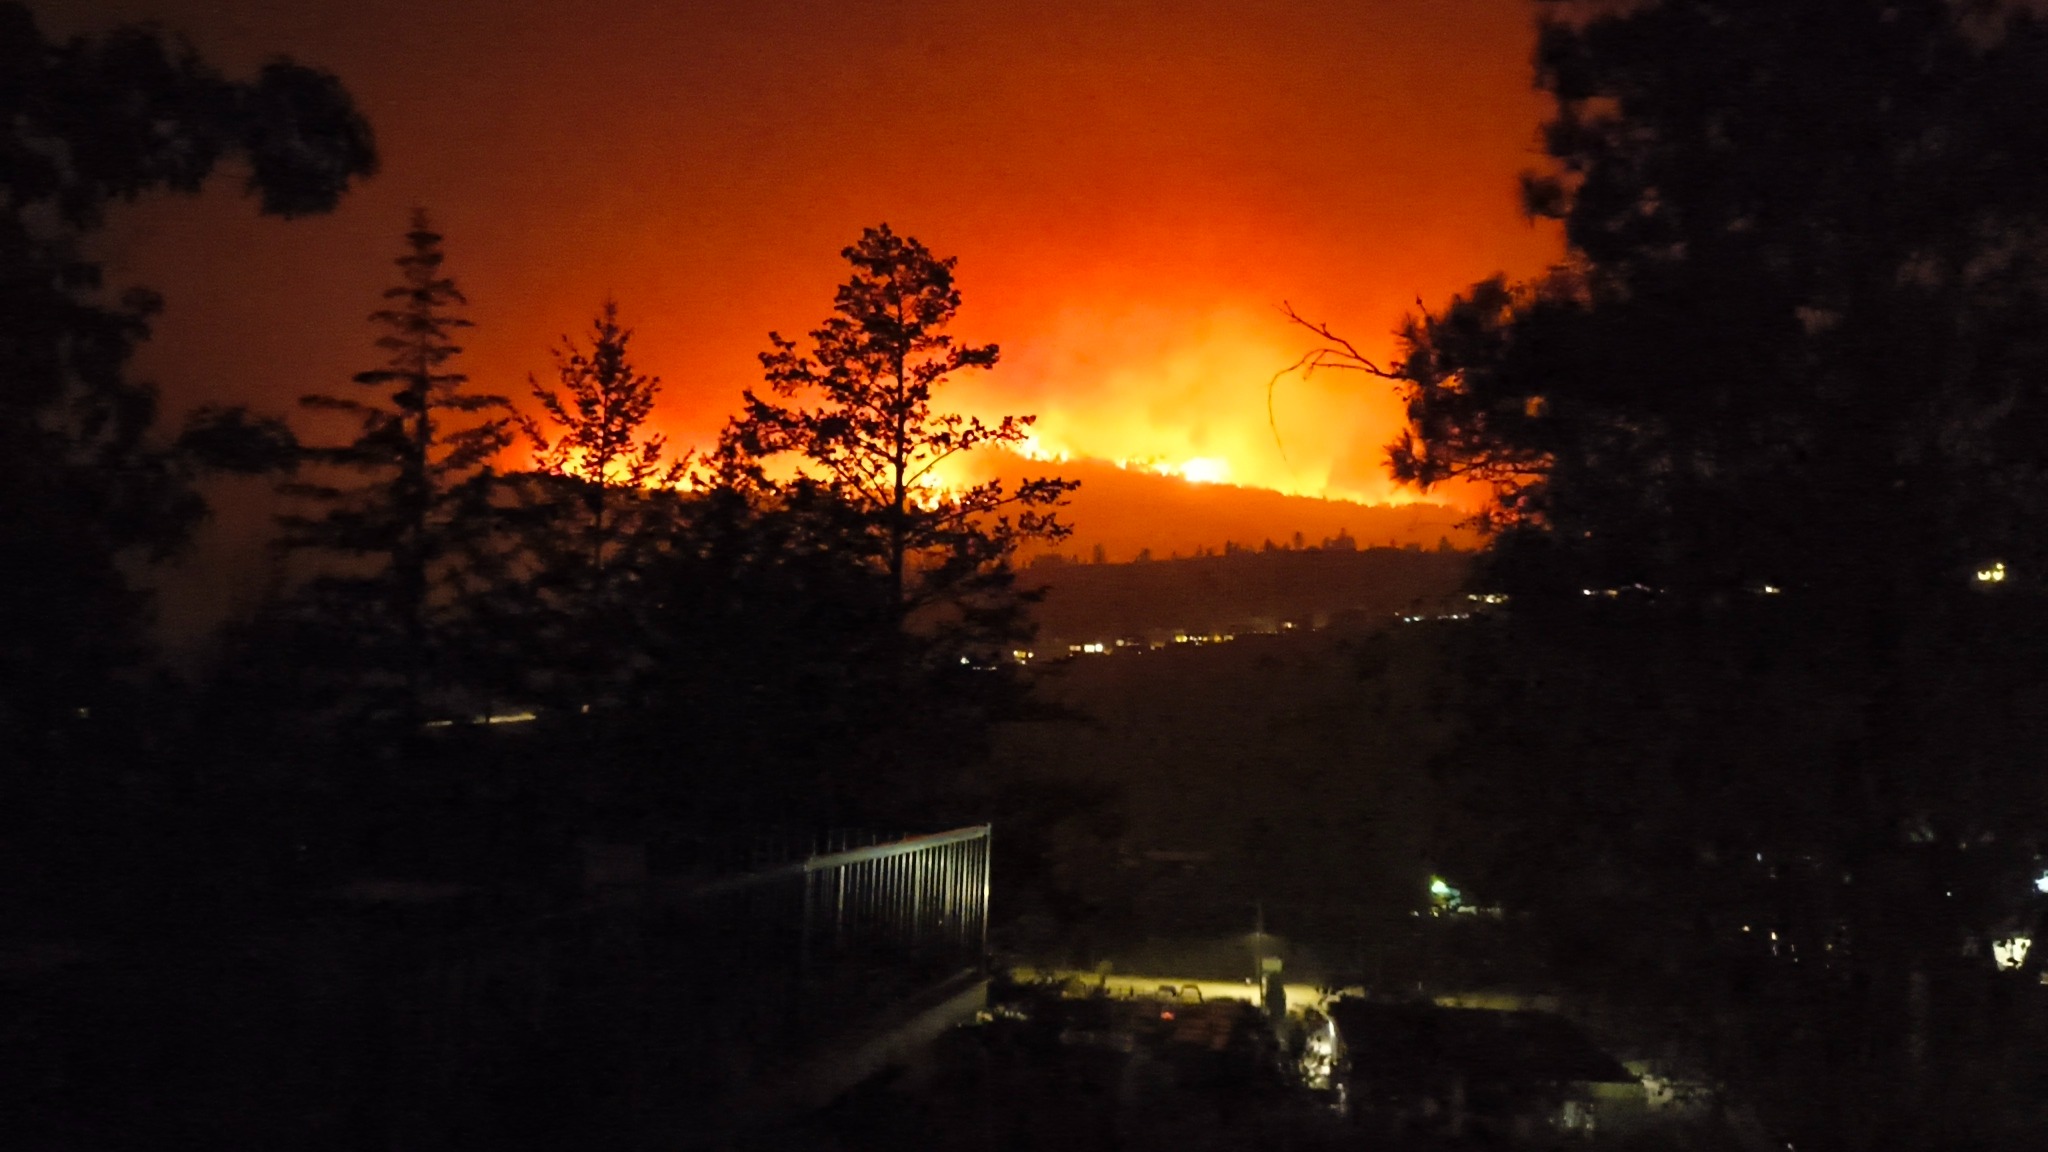
Wildfire line visible at night beyond homes and trees in Summerland

Fire line near homes

These are the moments that turn ordinary life into evacuation, uncertainty and a long recovery process.

Purpose of this free software: to help people document and organize claim receipts quickly, accurately and privately while they are still dealing with the emotional and practical impact of a wildfire or other major loss.

Designed for ongoing claims, not just one spreadsheet

Wildfire recovery can mean multiple submissions over weeks or months. Receipt Capture keeps the live records, images, submission history, and backups together.

1

Smart Phone Capture

Scan a QR code, take a receipt photo, and have it appear on the laptop immediately for accept/reject review.

Verify Before Saving

OCR suggests the merchant, receipt date and amount. You remain in control and can edit every field before saving.

#

Claim Information

Enter the claimant/household name, insurance company, policy number, claim reference and currency once. After saving, the form collapses into a compact summary with an Edit Claim Information button. The values are carried into Master XLSX files and submission packages. Currency is stored per claim/submission; Receipt Capture does not perform exchange-rate conversion.

Submission Tracking

Packages contain only unsubmitted receipts. Successfully packaged records are marked Submitted so the next batch does not duplicate them.

XL

Email-aware Packages

Create readable XLSX + receipt ZIP packages with Standard, Email-friendly or Compact outgoing images. If a package is over 10 MB, Receipt Capture can split it into normal Part X of N ZIP attachments.

BK

Backup & Restore

Create consistent backup ZIPs and restore them later. Restore validates the file and automatically creates a pre-restore safety backup before replacing live data.

DEL

Delete accidental scans

Remove an unwanted receipt from the live claim database and both local image copies after confirmation. Previously submitted history stays preserved.

A fast receipt-by-receipt workflow

The goal is to know immediately whether a receipt is readable before putting it back in the pile.

Start Receipt Capture

The computer opens the dashboard in your browser and displays a session QR code.

Pair a smart phone

Put both devices on the same private Wi-Fi network you trust and scan the QR code. No phone app installation is required. Do not use public/shared guest Wi-Fi for receipt transfer.

Photograph a receipt

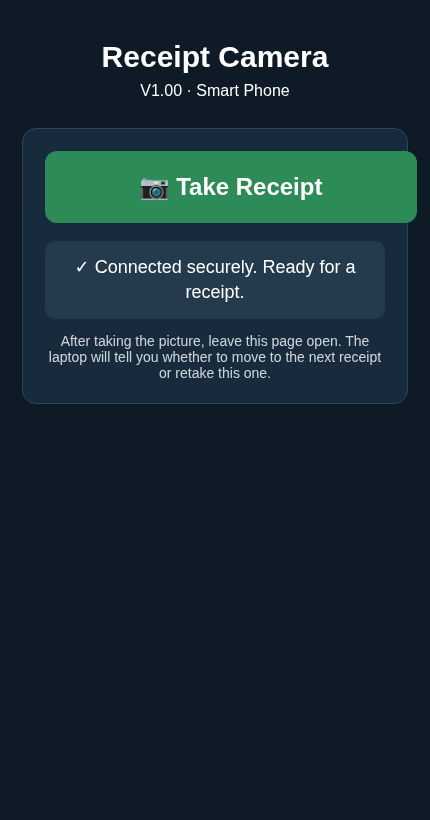
Tap Take Receipt. The photo transfers directly over your local network and appears on the computer.

Review, correct, save

Rotate if needed, verify merchant/date/amount/category, then Accept & Save or Reject / Retake.

Create a submission

Choose a submission date and outgoing image size. Receipt Capture estimates attachment size and can split packages over 10 MB into normal ZIP parts.

Continue later

New receipts remain unsubmitted for the next package. Corrections to already-submitted receipts are reopened for resubmission.

What it looks like

These are mock screenshots using fictional claim information and sample receipts.
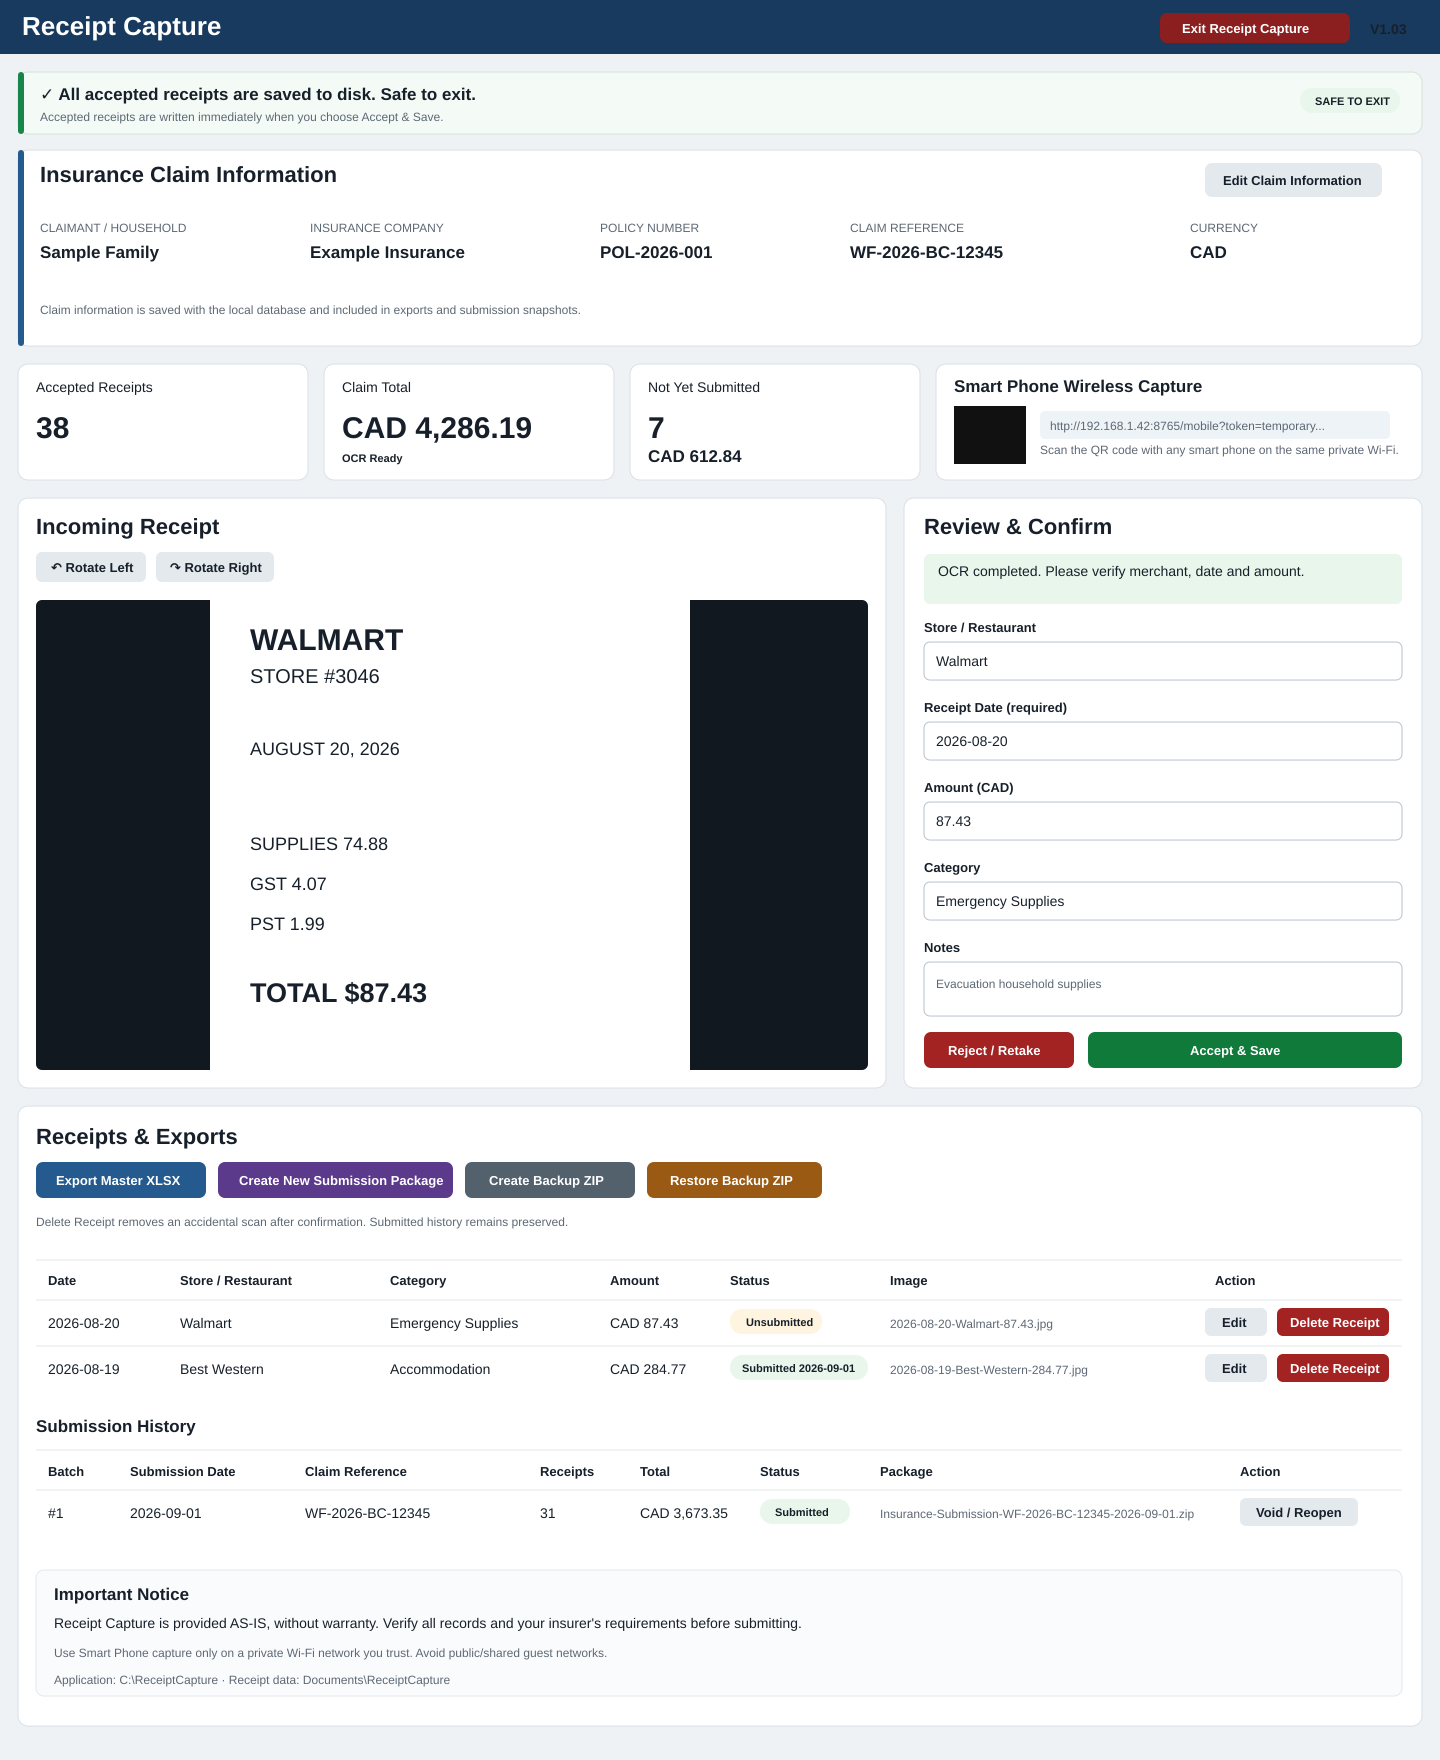
Mock Receipt Capture desktop dashboard showing claim information, receipt preview, OCR fields and submission history
Desktop dashboard: claim information, wireless pairing, immediate receipt preview, editing, backup/restore, exports and submission history.
Mock smart phone Receipt Camera capture page
The smart phone side is deliberately simple: Take Receipt, then wait for Accepted or Retake.
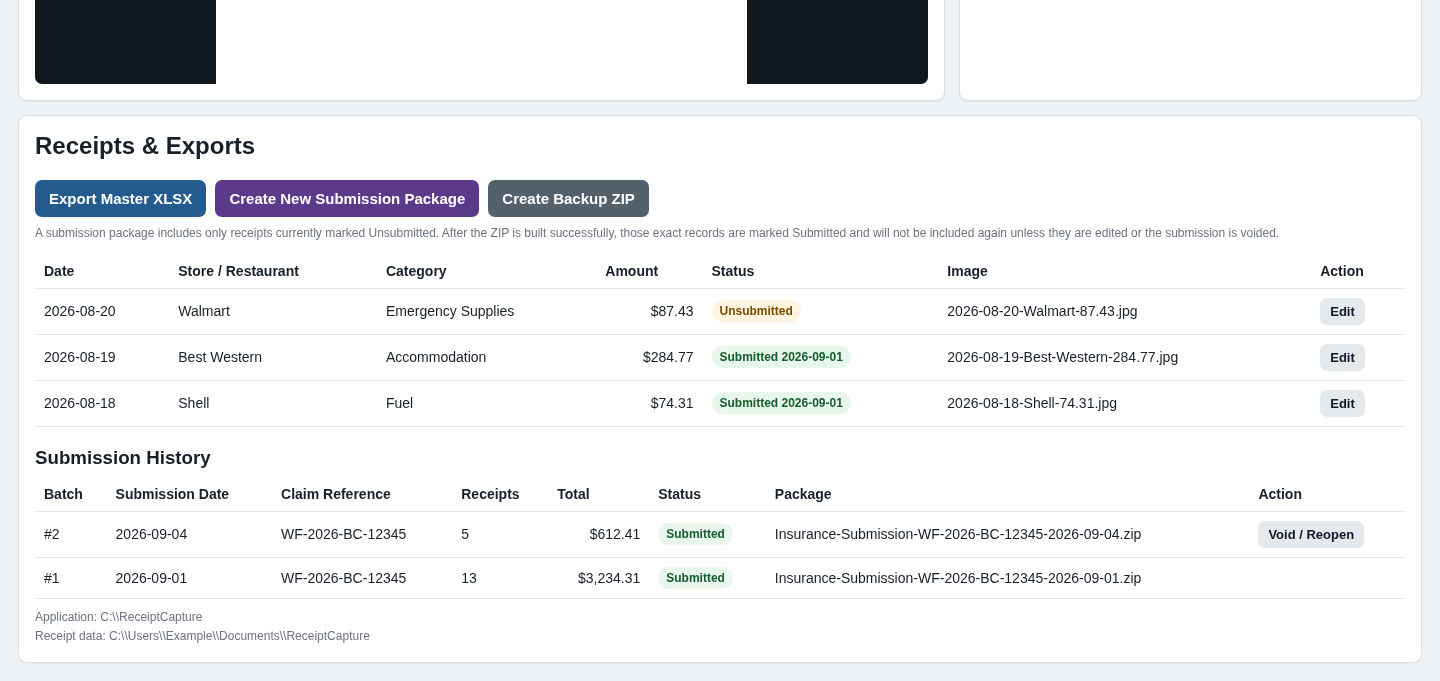
Mock Receipt Capture receipt and submission history table
Submitted and unsubmitted records remain visible, with dated batches preventing accidental duplicate submissions.

Free downloads

Version 1.03 adds configurable claim currency, safer clean-slate installers, email-aware submission sizing/splitting, outgoing image-size presets, stronger Excel/data validation, and the existing local-network and backup/restore protections. Downloads contain the application files, installer/launcher scripts and documentation. Donations are optional.

Windows 10 / 11

Fixed application folder: C:\ReceiptCapture
Data: Documents\ReceiptCapture

Requires Python 3. The installer can normally install Python and Tesseract OCR using WinGet.
Download Windows V1.03

ZIP · ReceiptCapture-Windows-V1.03.zip

SHA-256: 87997cb733417b16f73047ef6f7792f423b4ff27c090e1ed0142552704e6843e

macOS

Fixed application folder: ~/Applications/ReceiptCapture
Data: ~/Documents/ReceiptCapture

Requires Python 3. The installer uses Homebrew for Python/Tesseract when Homebrew is already available.
Download macOS V1.03

ZIP · ReceiptCapture-macOS-V1.03.zip

SHA-256: 6efcfeb06c62a3ee97c3438dab2e9e03b1d4a1e38f557933b6814f1e431a7673

Installation guide

The application and your receipt data are deliberately kept in separate directories so software updates do not replace claim records.

Windows installation

  1. Exit Receipt Capture if it is already running.
  2. Download and extract the Windows ZIP. Downloads is fine.
  3. Double-click INSTALL-RECEIPT-CAPTURE.bat.
  4. The installer asks whether to Start with a clean slate. The default is NO after 5 seconds, which preserves existing receipts/settings. Choose YES only when intentionally troubleshooting or starting over; the previous data is moved to one rolling ReceiptCapture-PRE-RESET safety folder.
  5. The installer always updates C:\ReceiptCapture; it does not create version-numbered runtime folders.
  6. When Windows Firewall prompts, allow Private networks only.
  7. Use the Desktop Receipt Capture shortcut for normal use.

The installer is for first installation and upgrades only. Daily startup uses RUN-RECEIPT-CAPTURE.bat.

macOS installation

  1. Exit Receipt Capture if it is already running.
  2. Download and extract the macOS ZIP in Finder.
  3. Double-click INSTALL-RECEIPT-CAPTURE.command.
  4. If macOS blocks the downloaded script, Control-click it, choose Open, then confirm.
  5. The installer asks whether to Start with a clean slate. The default is NO after 5 seconds, preserving existing data. YES moves previous data to one rolling ReceiptCapture-PRE-RESET safety folder and starts with an empty data set.
  6. The installer always updates ~/Applications/ReceiptCapture.
  7. Use the created Receipt Capture.command Desktop launcher for normal use.

If Python 3 is missing, install it from python.org. If Homebrew is present, the installer can use it for Python/Tesseract.

Daily usage

  1. Start Receipt Capture on the computer.
  2. Enter the Claimant / Household Name, Insurance Company, Policy Number, Insurance Claim Reference, and Currency, then click Save Claim Information. The entry form collapses to a read-only summary; use Edit Claim Information whenever needed.
  3. Put the smart phone and computer on the same private Wi-Fi network you trust. Do not use public/shared guest Wi-Fi for receipt transfer.
  4. Scan the dashboard QR code with the phone. The QR contains a temporary pairing token and expires when Receipt Capture restarts.
  5. On the phone tap Take Receipt and photograph the receipt flat, well lit and as square to the camera as possible.
  6. On the computer review the photo. Use Rotate if necessary.
  7. Verify Store/Restaurant, Receipt Date, Amount, Category and Notes. OCR is only a suggestion.
  8. Click Accept & Save. The untouched original and medium insurance copy are saved immediately.
  9. Saved receipts can be Edited or Deleted. Delete requires confirmation and removes both image copies; submitted history remains unchanged.
  10. If the picture is blurred/cut off, choose Reject / Retake while the receipt is still in front of you.
  11. When finished, use Exit Receipt Capture. A green SAFE TO EXIT indicator confirms accepted receipts are saved.
Date safeguard: Receipt Capture does not silently use today's date when it cannot reliably read the receipt date. The date must be supplied before the receipt can be accepted.
Currency: choose a three-letter currency code such as CAD, USD, EUR or GBP in Claim Information. The selected currency is used for dashboard totals, XLSX totals and submission snapshots. Receipt Capture does not convert currencies or exchange rates.

Insurance submission packages

  1. Review the receipt list and make sure the saved claim information is correct.
  2. Click Create New Submission Package.
  3. Select the date you intend to submit the package.
  4. Choose an outgoing image preset: Standard, Email-friendly, or Compact. These settings change only the copies placed in the outgoing package; saved Originals and local receipt images are not reduced.
  5. Receipt Capture estimates the outgoing size. If it is over 10 MB, the recommended option is to Split into multiple normal ZIP attachments. You may instead choose Keep everything in one ZIP if your email or insurer portal accepts a larger file.
  6. The package is built from Unsubmitted receipts only. If split, each Part X of N ZIP is independently extractable and contains its own XLSX plus the receipt images listed in that workbook.
  7. Only after every required ZIP part is created successfully are those exact receipts marked Submitted.
  8. The next package contains only later/unsubmitted receipts.

If a submitted receipt is later corrected, the original historical submission is preserved. The corrected live record becomes Unsubmitted so it can be included in a correction/resubmission batch. If a package was created by mistake before being sent, Void / Reopen can reopen its receipts while retaining the audit history.

About the 10 MB threshold: email and insurer portal limits vary. Receipt Capture uses 10 MB as a conservative convenience threshold, not as a statement of your provider's actual maximum attachment size.

How to send the package to your claims adjuster

  1. Create the submission and keep the generated ZIP file(s) together.
  2. If your insurer provides a secure claim portal, prefer that method. Otherwise attach the generated ZIP to email only after verifying the adjuster's address. The ZIP contains an XLSX workbook and its matching receipt images.
  3. If Receipt Capture created Part 1 of N, Part 2 of N, etc., send every part. If they fit within your provider's limit, attach them to one message; otherwise send separate messages clearly labelled Part X of N using the same Claim Reference and Submission Date.
  4. If your adjuster requests the spreadsheet separately, open the ZIP and copy out the XLSX file, then attach that XLSX alongside its ZIP.
  5. Before sending, verify the adjuster's address/claim portal, Claim Reference, receipt count, amounts and attachment list.
  6. Keep the sent email or portal confirmation and the exact generated package file(s) for your records.

Master XLSX contents

  • Claim Information — claimant/household name, insurance company, policy number, claim reference, currency, export time, receipt count, total and the AS-IS notice.
  • All Receipts — complete receipt register with submission status.
  • Unsubmitted — items not yet tied to a submission batch.
  • Expense Summary and Daily Summary.
  • Submission History — each batch snapshots claimant/household, insurer, policy number, claim reference, currency, outgoing image preset, date, total and all package filenames.
  • One historical Submit YYYY-MM-DD tab for each successful submission.
  • Donations — optional donation information; the software itself remains free.

Backups & Restore

Create Backup ZIP uses SQLite's backup mechanism to preserve a consistent database snapshot plus original images, processed receipt images, exports, historical submission packages and pending images. Restore Backup ZIP validates the selected file, refuses to restore while a receipt is awaiting review, and automatically creates a PRE-RESTORE-SAFETY backup before replacing live data. Keep occasional backup copies somewhere separate from the computer being used for the claim.

Deleting an accidental scan

Use Delete Receipt beside a saved receipt when a scan was created in error. After confirmation, Receipt Capture removes the live database record and both the original and medium-size image. If the receipt was already submitted, the program gives an additional warning: the historical submission snapshot/package is preserved exactly as it was and deletion does not retract anything already sent to an insurer. Recovering a deleted live receipt requires a backup.

Troubleshooting

Phone cannot connect

  • Confirm both devices are on the same private Wi-Fi network you trust.
  • Rescan the current QR code after restarting Receipt Capture; old pairing links expire.
  • Windows: confirm Python is allowed on Private networks.
  • macOS: allow incoming connections if prompted.
  • Public/guest Wi-Fi may isolate devices and should not be used for receipt transfer. Use a private network or hotspot you control instead.

OCR is wrong or unavailable

  • OCR is optional; enter fields manually if necessary.
  • Photograph receipts in bright, even light.
  • Avoid shadows, glare and extreme angles.
  • Windows installer attempts to install Tesseract.
  • macOS users with Homebrew can run brew install tesseract.
Before submitting to an insurer: open the XLSX and spot-check dates, amounts, totals, claimant/insurer/policy/claim information and the associated receipt images. OCR and user entry can both contain mistakes.

Privacy & security by design

Insurance receipts can contain sensitive details. V1.03 keeps the dashboard local to the computer and adds several safeguards for public distribution.

Local storage

The database and images are stored on your own computer. Receipt Capture does not upload them to a developer-operated cloud service.

Temporary phone pairing

The phone QR contains a random session token that changes each time Receipt Capture restarts. The token is redacted from the server console log.

Laptop-only dashboard

Receipt browsing, exports and administration stay on localhost. State-changing dashboard requests use a separate temporary local session token and reject unexpected Host requests.

Input & upload validation

Phone uploads are limited to JPEG, PNG or WebP, with file-size and image-dimension limits. Receipt text/amounts are bounded and user-entered spreadsheet text is neutralized so it cannot become an Excel formula when exported.

Safer backup restore

Restore checks ZIP paths, symbolic links, expansion size/compression ratios and SQLite integrity before replacing live claim data.

Private network only

Receipt transfer uses local HTTP. The pairing token controls access, but Receipt Capture does not add TLS encryption. Use only a private Wi-Fi network or hotspot you trust.

Do not use public/shared Wi-Fi for receipt transfer. Avoid hotel, airport, campground, coffee-shop and guest networks. If you are away from home, use a private network or personal hotspot/network you control.

No cloud service is required. If your Documents folder is already synchronized by OneDrive, iCloud or another product, those independent settings may still copy your ReceiptCapture data. Receipt Capture does not control operating-system sync services. Consider BitLocker/device encryption on Windows or FileVault on macOS for data stored at rest.

Important disclaimer

Receipt Capture is provided free of charge and AS-IS, without warranty. It is a receipt organization tool, not legal, insurance, tax, financial or disaster-recovery advice. Always verify the information and your insurer's submission requirements. Receipt Capture is not affiliated with any insurance company, smart phone manufacturer, Microsoft, Apple or Interac Corp.